
Introduction to dlt: An Open-Source Python Library for Data Ingestion
A light-weight Python library for building your data ingestion pipelines

When it comes to building data ingestion pipelines, you may think of modern SaaS tools like Fivetran, Estuary, Airbyte, Portable, etc. And oftentimes it makes sense to use these off-the-shelf tools as they remove the complexity and the overhead of implementing the code and logic to ingest data from various sources.
But there are cases where you need to ingest data from a source that these SaaS tools don’t have a built-in connector for, or you simply want to have a full control over your data ingestion pipelines. Also, the budget constraints could be an issue for using a data ingestion SaaS tool.
This is where dlt (data load tool) comes into play. It’s a framework around which you can write your data ingestion pipelines in Python. It comes with many, useful built-in features.
In this article, I’ll walk you through what dlt is, what makes it unique, and why you might want to use it over other tools.
Note: dlt (data load tool) is NOT the same thing as dlt (delta live tables) from Databricks. dlt that I’m talking in the article is backed by a company called dltHub.
What is dlt? ✅

dlt is a light-weight, Python-native data ingestion library that simplifies your data extraction and loading processes. It comes with many built-in sources (to get data out of) and destinations (to load data into), from SQL databases (e.g. Postgres), cloud storage (e.g. S3), and cloud data warehouse (e.g. Snowflake). It also supports REST API sources, meaning you can write your custom code to ingest data from a REST API. In addition, dlt lets you transform data before loading into your destination, which is a big plus for cases where you need to format your data in a specific way.
dlt is getting more and more popular. It has over 1M downloads/month!

You may see “dlt+“ here and there on dltHub’s website, but it’s just their paid offering as opposed to the open-source library “dlt“ that I’m referring to in this article.
If you have heard of or used a tool called Meltano/Singer, dlt is similar in idea in that they are open-source tools that simplify the data ingestion and loading process.
What Makes dlt Stand Out? ✅
🐍 Python-first approach - No need for YAML-heavy configurations. It’s just Python scripts.
🧠 Automatic schema inference & evolution - Handles schema changes without breaking pipelines.
🛠️ Built-in data transformation - Supports light transformations before loading.
📥 Incremental loading - Efficiently tracks and loads only new or updated data.
🌐 Support for multiple destinations - Works with databases, warehouses, and lakehouses.
🔍 Reliability & observability - Built-in logging and monitoring for debugging.
With dlt, you can build reliable, efficient pipelines with ease. You can use it anywhere, run it in a notebook or any Python script, wherever Python is running. Also, dlt supports Iceberg and Delta table formats as as destinations (with some limitations), further expanding its utility for modern data lakehouse architectures. Another useful piece is that there are built-in templates that allow you to quickly build data ingestion pipelines.
Once your data is loaded into your warehouse or object storage, you can use a data transformation tool like dbt or SQLMesh to take it from there.
Getting Started with dlt: A Practical Example
I won’t go too deep into explaining each dlt component, but my aim is to showcase a working solution to help you understand the overall implementation. So you can feel comfortable enough to tackle your next project with dlt. You can also use this as a starting point or a template.
In this project, you’ll see how to create a data ingestion from a NYC Open Data dataset (Motor Vehicle Collisions) into S3/local file system as parquet file.
Setup
First things first, let’s install the dependencies (assuming you cloned the GitHub repo):
cd intro-to-dlt
uv venv
source .venv/bin/activate
uv sync
You usually start a dlt project with a CLI command like the following, which generates a scaffolding of the project:
# dlt init <source> <destination>
dlt init rest_api filesystem
But since we already have the solution in place, we won’t need to do that in this example.
Now, let’s change the gears a bit and take a look at the folder structure:
intro-to-dlt/
├── .devcontainer/ # Development container configuration
│ ├── devcontainer.json # VS Code devcontainer settings
│ └── Dockerfile # Container definition
├── .dlt/ # DLT configuration directory
│ ├── config.toml # DLT configuration settings
│ └── secrets.toml # Secure storage for credentials
├── .env # Environment variables file
├── .env.example # Example environment variables file
├── .gitignore # Git ignore patterns
├── .python-version # Python version specification for pyenv
├── pyproject.toml # Python project configuration
├── README.md # Project documentation
├── requirements.txt # Python dependencies
├── rest_api_pipeline.py # Main pipeline code for NYC Open Data
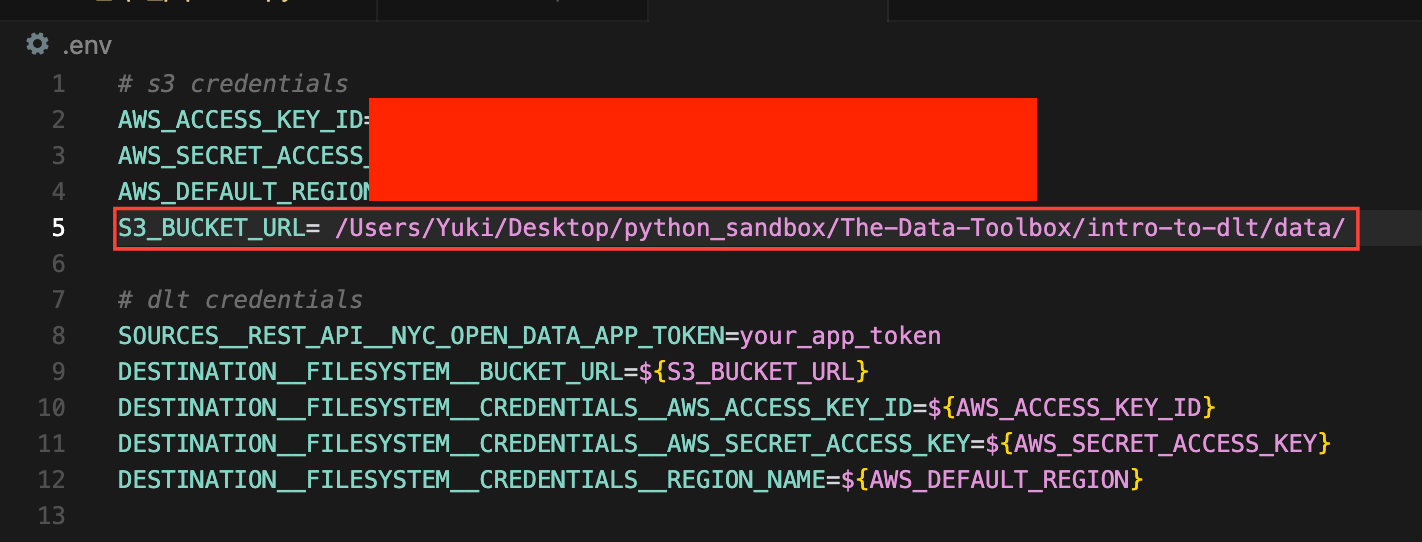
└── uv.lock You also need to copy the env.example file and add your S3 configurations:
cp env.example .envCode
rest_api_pipeline.py is where your pipeline code is defined. Let’s see how it’s constructed:

To summarize the steps in the code, it does:
Define the source (NYC Open Data) with
@dlt.sourceDefine the resource(s) (an API endpoint for the Motor Vehicle Collisions dataset) with
@dlt.resourceDefine the pipeline (
dlt.pipeline)Run the pipeline (
pipeline.run)
In the dlt source function, I define the core configurations of the source, like the base URL and pagination details. Personally, I love how dlt makes pagination effortless, using a consistent format that you can apply across all your data ingestion scripts.
In this example, I’ve defined only one dlt resource function, but in practice, you can add multiple API endpoints as separate dlt resources and run them all together within one dlt source, or configure and run them individually.
The write_disposition setting controls how your data is written: whether you want to incrementally update, replace the table, or append new data with each run.
You can learn more about fine-tuning your configs in their documentation.
Running the Pipeline
Before running a dlt pipeline, you’ll need to configure credentials for both your source and destination systems. The source system being an open source dataset, I won’t need anything (there is an optional API key you can pass in to increase the rate limit).
In this project, I set up the env variables in the way that dlt can recognize and refer to them when running the pipeline. You may also choose to use secrets.toml to store credentials in development.
Let’s run the pipeline. You’ll just run the Python script:
uv run python rest_api_pipeline.pyYou'll get some logs in the console showing the progress of the pipeline run:

Once you successfully ran your dlt pipeline, you’ll see the output file in your S3 bucket:

If you specified your local file directory instead of a S3 path in the .env file, you’ll see a folder with the output file in it:

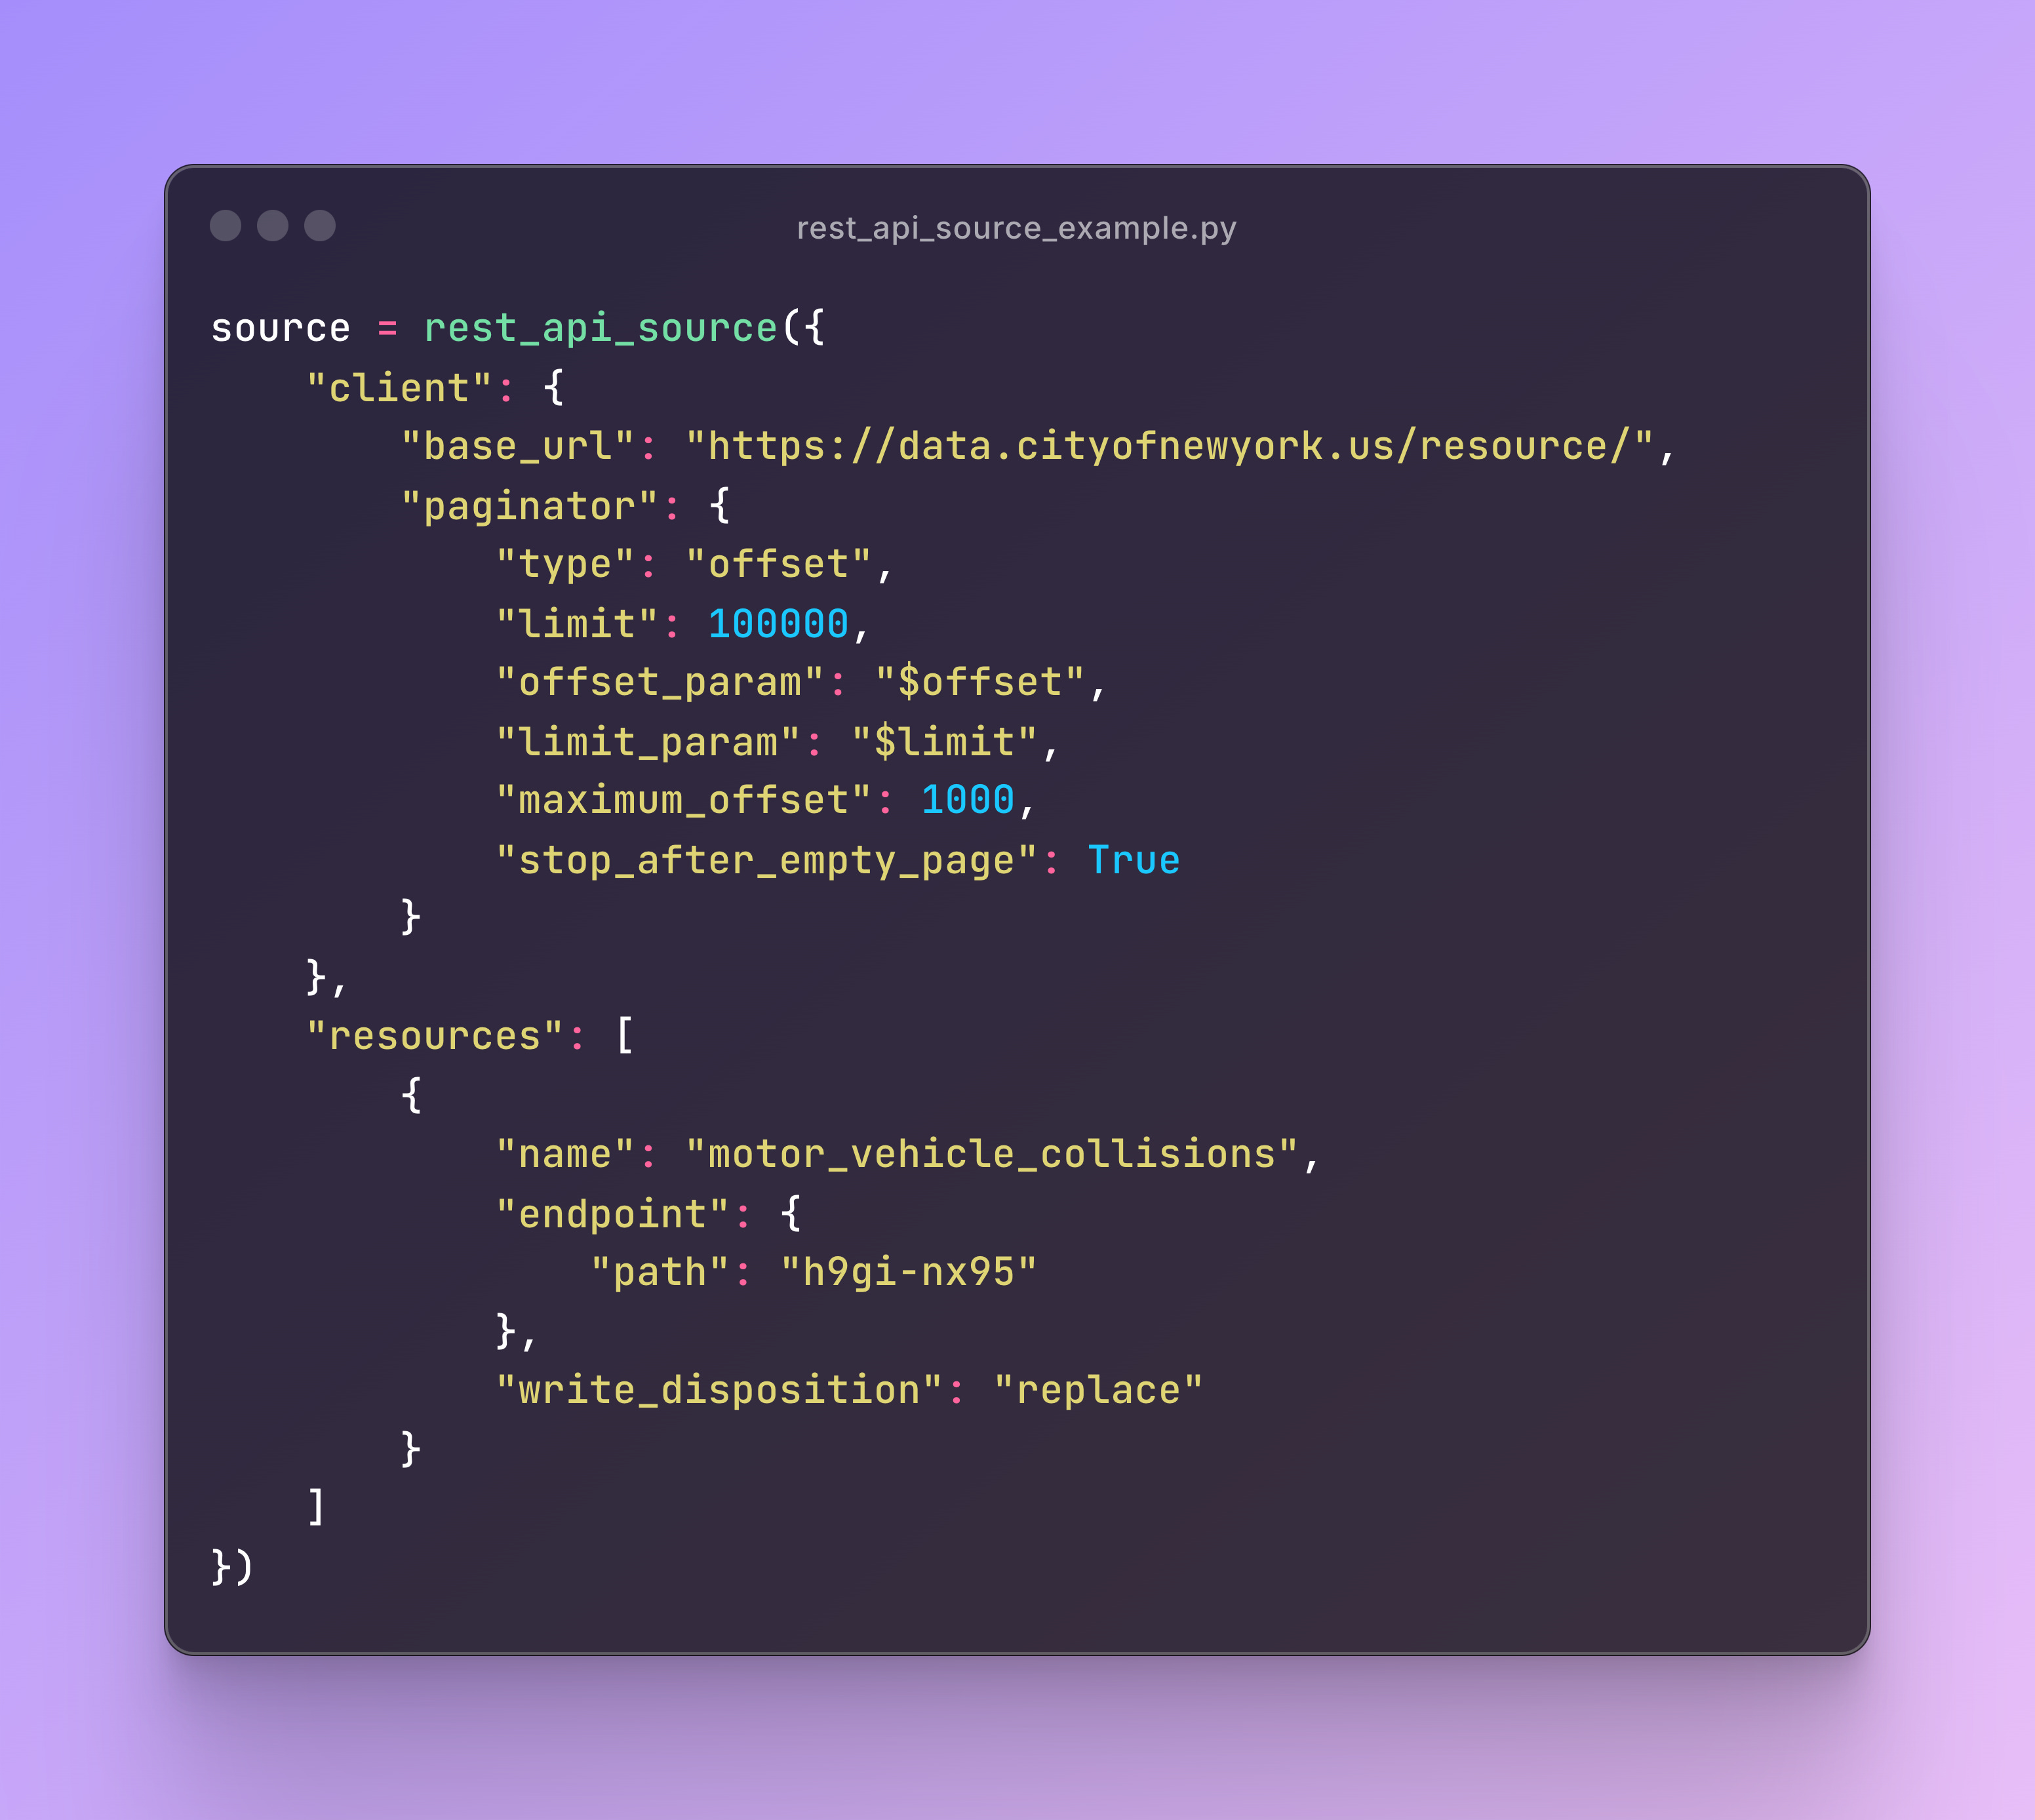
Note: Even though the dataset has more than 2 million rows, I set the maximum offset as 1000 in the pagination configuration. That’s why the output file only has 100k rows, which I specified under
limitin the pagination config. To learn more about all the configuration and paginator option, go to this dlt’s documentation page.
You can inspect the pipeline run with a CLI command:
uv run dlt pipeline nyc_open_data_pipeline infoThe output will be shown in the console:
Found pipeline nyc_open_data_pipeline in /Users/Yuki/.dlt/pipelines
Synchronized state:
_state_version: 1
_state_engine_version: 4
pipeline_name: nyc_open_data_pipeline
default_schema_name: nyc_open_data_source
schema_names: ['nyc_open_data_source']
dataset_name: nyc_open_data
destination_type: dlt.destinations.filesystem
destination_name: None
_version_hash: q59B+LZNVxw4gNmAIBReu/rDmgfWTrkjLJrtNXtME1c=

sources:
Add -v option to see sources state. Note that it could be large.

...
...
...
You can see the pipeline information visually using Streamlit instead of printing the output in the console. You can simply run the command:
dlt pipeline {pipeline_name} show. You’ll need to install Streamlit as a dependency.
dlt’s website lists out all the useful CLI commands.
Another Way to Define a REST API Source
I used the RESTClient class for defining the dlt source for the REST API, but you can use a more declarative approach with rest_api_source (which uses RESTClient under the hood). I just personally prefer using RESTClient. If I used rest_api_source instead, it’d look something like this:
Using Iceberg and Delta Table Formats
You can write your data as Iceberg or Delta tables with dlt. You may just add an argument to the dlt resource function like @dlt.resource(table_format=’iceberg’). This opens many doors in using dlt with the lakehouse architecture. Note that you’ll need to install additional dependencies such as pyiceberg for Iceberg and deltalake for Delta. Also there are some limitations around this, which you can check in their documentation page (Delta limitations, Iceberg limitations).
Running dlt in Production
In production, you can set up your dlt scripts in GitHub and use GitHub Actions to schedule data ingestion jobs. Environment variables can be managed through GitHub Secrets or a cloud secret manager, and referenced directly in your dlt scripts. You can run dlt jobs using serverless functions or on a regular server like EC2.
One of dlt’s key selling points is that it runs anywhere Python runs, which greatly simplifies deployment.
Why Use dlt Over Other Tools? ✅
dlt vs SaaS tools
SaaS tools like Fivetran, Estuary, and Airbyte are great.
You can connect a source to a destination in just a few clicks.
But they’re not without tradeoffs:
💰 Pricing can get steep as data volumes grow
🧩 Limited support for niche or internal systems
🔒 Lack of customization for specific needs
🕳️ Black-box behavior, hard to debug or extend
They're incredibly useful, but not always the right fit for every use case.
dlt vs Custom Python Scripts
If you’re technical enough, writing custom data ingestion scripts can be a trivial task, especially with the help of AI. Then why should you use dlt?
The issue with Python scripts is to make it really robust, you need to handle many things such as:
Logging
Pagination
Authentication
Incremental loading
Schema evolution
Retry mechanisms
Sure, you can implement all these in your custom scripts. But when you start doing that for multiple sources, you’re repeating yourself or perhaps you’ve already created a framework on your own to avoid that repetition. In any case, you’re essentially reinventing the wheel. With dlt, all these are already built for you so you can build your pipelines more quickly and efficiency.
I started using dlt last year and never looked back. The only time I’d use custom Python scripts for ingesting data is when in testing or development that I just need to look at the data or test the source API endpoint. Otherwise, dlt does a great job on standardizing the way you write your ingestion scripts, which is very much needed for any production pipelines.
Conclusion
dlt has become one of my favorite tools for data projects. It simply makes data ingestion easier.
If you’re looking to learn dlt, dltHub has its certification programs where it helps you learn dlt. I personally took it and it really helped me solidify my understanding of the concepts around building pipelines in dlt. I suggest that you check it out!
Please feel free to reach out to me via LinkedIn or my website if you need help implementing data ingestion pipelines with dlt :)
Full Disclosure: My company, Orem Data, is a consulting partner of dltHub and also partners with Estuary. That said, the opinions expressed in this article are my own, and I do my best to provide a fair and balanced perspective.
Great post! I’ve also been dabbling with dlt since mid last year and also became a fan pretty quickly too because of how it handles pagination, normalization and a bunch of other stuff that was previously quite manual. There’s also some nice integration with Dagster making scheduled data ingestion pretty straightforward
I love the option of dlt incremental loading for handling of late-arriving updates.